Guitar Finger Exercises
In this another lesson of “How to play Guitar” we will explore three very important Guitar finger exercises.
Also, there is other lessons available for beginners on below
topics,
So if in case you would like to check the basics of these topics, you can check these as well by clicking on their title.
Before explaining these Guitar finger exercises, I would
like to tell you the finger names, this is required to understand the finger exercises
since when I will explain any guitar picking so you should follow me exactly in
the same way I am explaining.
These finger name is been followed globally by everyone who
so ever is playing guitar, so again this is important to know their names.
1.
Index finger is known as finger 1 or Pointer
finger.
2.
Middle finger is known as finger 2.
3.
Ring finger is known as finger 3.
4.
Little finger is known as finger 4 or Pinky.
The Strings are numbered from the bottom line. The thinnest
string is named as first string, the second string is just above to this one,
same for third, fourth and fifth string and the last or the thickest string is
your sixth string.
The spaces in the fretboard are numbered as one, two, and
three and so on from left to right. You may observe that spaces given in the
fretboard is narrowing down from left to right, this means that guitar fret on
the right side is wider that the fret on the left side.
Now coming to the GUITAR
FINGER EXERCISES, first of all these are very useful not only in the
beginning but when you started playing Guitar in the full pace. This is because
these exercises give you a direction and strength to play guitar in a better
way.
The recommended duration is to give 15 to 20 minutes to each guitar finger
exercise every day.
Explanation on these exercises may seem so long but I have
explained all instructions and procedure in very simple language so that you
can easily follow the same.
1.
Plain Horizontal Inversion:
This is one of the basic exercises and you might be familiar
with this one, remember to place your thumb in the back of fretboard to apply
adequate pressure. Let’s begin with the exercise now.
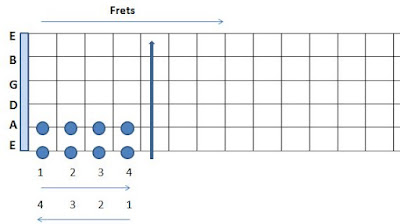
In this exercise you need to pick strings from first one to
sixth and then move one fret to the right and then from sixth to first string
then again move one fret to the right and again from first to sixth, one by one
and play four consecutive guitar frets in the same string.
First of all you need to place your first finger on the
first string and first guitar fret and play first string. Then place your
second finger on the first string and second guitar fret and play first string.
Then put third finger on the first string and third guitar fret and play first
string then fourth finger on the first string and fourth guitar fret and play
first string.
This way we have moved fingers and guitar frets from left to
right now change the direction and play the last note that is fourth finger on
the first string and fourth guitar fret. Then third finger on the first string
and third guitar fret then place second finger on the first string and second guitar
fret and play, then the first finger on the first guitar fret and same string.
Now change the string and move to string number two, start
placing fingers from first guitar fret to fourth guitar fret in the same way we
did on string number one and play the inversion or reverse on the same string
from fourth guitar fret to first. Remember to change your fingers with every
play from first finger at starting guitar fret and other three individually on
next three frets.
Now change the string to third and perform the same (First guitar
fret to fourth fret and reverse). Then repeat same on second and then first
string.
Now your fingers are at the top string i.e. sixth string.
Change Guitar fret: You need to change the initial guitar
fret from first to second (Basically you need to move one fret to the right once
you completed this exercise for all six strings and four frets).
So now your first finger is on second guitar fret and sixth
string, second finger is on third guitar fret and sixth string, third finger is
on fourth guitar fret and sixth string, fourth finger is on second guitar fret
and sixth string.
Now play each note (Position) in the same way from second guitar
fret to fifth guitar fret and then reverse. Then change the string from sixth
to fifth (same fret position) and repeat. Then repeat same till you reaches
first string.
Change guitar fret: Again you need to change and move your
entire fingers just one fret towards right side and repeat the whole process.
You can repeat this till your last finger touches 12th
guitar fret or fifteenth guitar fret based on your suitability.
NOTE: Try to play each note or finger position correctly
with clear sound of that note and don’t try to hurry while playing this. Try to
play in a way that each note play have same time interval and clear sound.
2.
Alternate Horizontal Inversion:
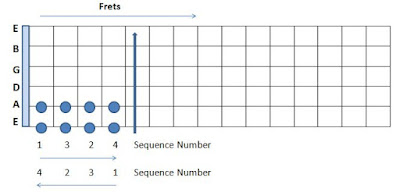
This is quite similar to the first Plain horizontal
inversion exercise. The only difference is that there are skip notes in between
in order to pick up alternate notes.
Place your first finger on first string first guitar fret
now instead of playing second fret (skip second guitar fret) and play first
string on third guitar fret from third finger. Then after you need to place
your second finger on second guitar fret and play same string. Then pick up the
fourth guitar fret from fourth finger and play first string.
1st Fret -> 3rd Fret -> 2nd
Fret -> 4th Fret on first string.
Then Reverse, 4th Fret -> 2nd Fret
-> 3rd Fret -> 1st Fret on first string.
Repeat same on the second string then third and so on in the
same fashion explained for the first guitar finger exercise.
3.
Vertical Inversion:
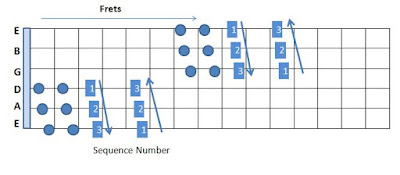
Let’s break this exercise into two parts,
A.
First three guitar strings
B.
Last three guitar strings
A. First three guitar strings:
Place your first finger on the first guitar fret and third
string, second finger on the second string and first guitar fret, and third
finger on the first guitar fret and first string.
Then reverse, (3rd finger 1st string
-> 2nd finger 2nd string -> 1st finger
third string) on the same guitar fret number one.
Then change the guitar fret and repeat all the steps from
third string to first and reverse.
Keep moving till you reached 12th guitar fret.
B. Last three guitar strings:
You don’t need to use your index or first finger in this
part of exercise.
Place your Second or middle finger on the first guitar fret
and sixth string, third or ring finger on the fifth string and first guitar
fret, and fourth finger or pinky on the first guitar fret and fourth string.
Then reverse, (2nd finger 6th string
-> 3rd finger 5th string -> 4th finger 4th
string) on the same guitar fret number one.
Then change the guitar fret and repeat all the steps from
third string to first and reverse.
Keep moving till you reached 12th guitar fret.
So far we have completed three exercises; there are more
exercises which I will try to discuss as soon as possible.
Hope you have enjoyed this post and it will help you to
play expedite the improvement on your guitar skill.
There is lot more to share, Keep in
touch and stay happy.
Happy Guitar Learning!!!


